“Nostalgia-Colored Glasses”: A Retrospective of Claremont’s X-Men, Part 12
The last two issues of the Paul Smith run deserve a special spotlight. Part of this is simply a question of execution. My original intention with this discussion was to treat the Paul Smith run as a whole, until I came to the realization that such a dissection of this story would be far too long. However, the other reason for this is that I have a deep fondness for these last two issues of the Smith run, especially where the character of Scott Summers is concerned. So this installment of the Retrospective will focus on the finale of the Mastermind story, and a brief discussion of that year’s X-Men Annual.
When last we left our merry mutants, Mastermind had taken the upper hand against the X-Men. Working with Viper and the Silver Samurai, he succeeded in taking control of the mind of Mariko Yashida. Using his influence over Mariko, Mastermind forces her to dump Wolverine at the altar, an act of great shame designed to humiliate Logan before everyone that matters to him. At this time, the X-Men are not aware of who is behind everything and why, but they would soon learn.
 Jason Wyngarde is perhaps one of the most cruel and sadistic villains in the X-Men’s rogues gallery up to this point. As we’ve discussed in previous columns, he was responsible for the corruption of Jean Grey and the birth of Dark Phoenix. At that moment, Jean Grey’s last act as herself was to show Mastermind the entire cosmos in revenge for his manipulation and betrayal, an act that drove him comatose. Since Mastermind could not get revenge against Jean for doing this, he instead embarks on another campaign, one designed to ruin the X-Men, the people that Jean loved most.
We see that Mastermind’s strongest grudge is against Cyclops, the leader of the X-Men. Scott was the man who broke Mastermind’s hold on Jean, and it’s likely that Wyngarde blamed Scott for his failure at the Hellfire Club. He may also possibly have blamed Scott for his failure to rise through the ranks of the Hellfire Club, since that incident was the moment when Wyngarde truly fell from grace. But because Wyngarde is a calculating and sadistic sociopath, he can never accept responsibility for his failures. Instead, he turns his failures into grievances against Scott and the X-Men, returning to his pattern of using illusions to set up an elaborate revenge scheme.
Mastermind’s scheme in this instance revolves around a new character who proves to be important throughout the rest of the Claremont era. This turns out to be Madelyne Pryor, a pilot that Scott meets in Alaska who is the spitting image of Jean Grey. During a family reunion with Corsair, Havok, and Scott’s grandparents, Scott has a whirlwind courtship with Madelyne that grows into something deeper. However, the question throughout the Smith run remains: is Madelyne the woman she claims to be, is she the reincarnation of Jean Grey, or is she something else entirely?
As discussed in the previous column, Chris Claremont always intended for Madelyne Pryor to be merely a body double, a woman who happened to look like Jean Grey. Claremont was influenced by Alfred Hitchcock’s movie “Vertigo”, in which another Maddie lures another Scott (“Scottie”, as he’s called in the film) through her resemblance to another woman. However, despite the retcons to her character in the Inferno crossover years later, Maddie Pryor was only meant to be a “red-headed red herring” and not a clone of Jean Grey. Claremont, Louise Simonson, and Ann Nocenti would eventually admit that their goal was to tease the audience, try to fool the audience into believing there was a deeper significance, but she was never meant to be anything more than the ordinary woman that Madelyne Pryor presented herself as.
However, the resemblance between Madelyne and Jean creates the perfect opportunity for Mastermind, who would use Maddie as a pawn in his scheme to destroy Cyclops. The Mastermind storyline, which would be called “From The Ashes” in 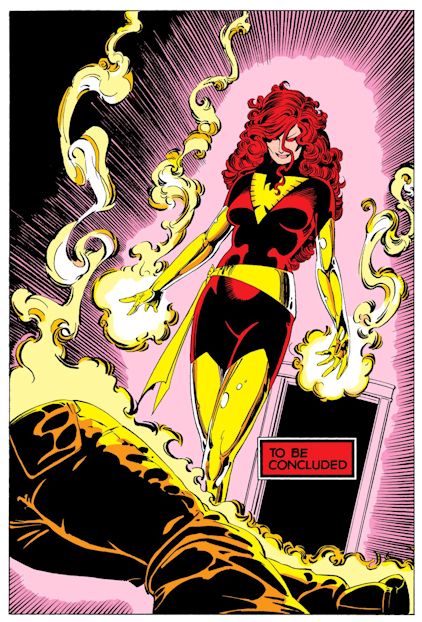 trade paperback collections (and which I will refer to it as for ease of reference), refers to the Dark Phoenix Saga more than once. Some of this is unavoidable, given that the same villain was involved in both stories and that Mastermind’s defeat in Dark Phoenix motivates his villainous plan in From The Ashes.
At the same time, it should be noted that Claremont is not referencing the past for the sake of nostalgia in From The Ashes. He is not trying to lure the reader in with nostalgia bait, rehash his past stories, or do what at that time might have been the obvious play. Both Scott and Mastermind are obsessed with the past, each in his own way, and Claremont is trying to confront them with this. At this time, Scott still has not fully put the ghost of Jean Grey to rest, and Mastermind is obsessed with his past glories and past defeats. They are both, for better or worse, defined by this one crowning moment in X-Men history, and by the one woman central to both men and who had loved them both. The difference is that one of them (for a time, anyway) is able to set the past aside and move on with his life, setting aside the burden of memory.
For all that she is teased as a possible villain in this story, and as much as she may have been villainized in later stories, Madelyne Pryor is not the villain here. If anything, she is an innocent victim who was used by Mastermind because of her resemblance to Jean Grey and because Scott Summers loved her. If Scott had never entered her life, if she looked like a different person, Madelyne may well have lived a normal life without mutants or evil schemes to ensnare her. But she looks like Jean Grey and she has an emotional bond with Cyclops, and for Mastermind, that is enough to destroy her too. This further illustrates how truly evil and sociopathic Mastermind is; he shows no thought whatsoever at using an innocent person to cruelly destroy his enemies on an emotional and physical level.
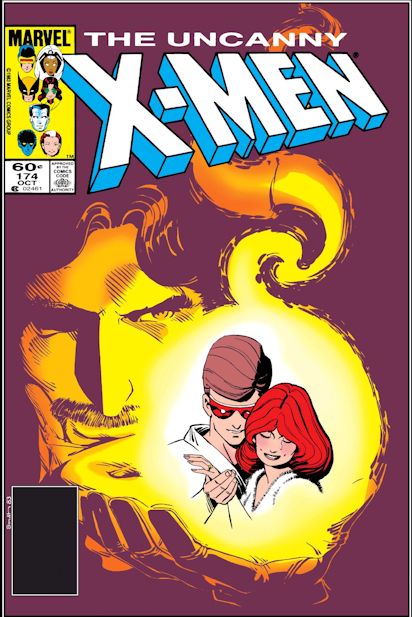
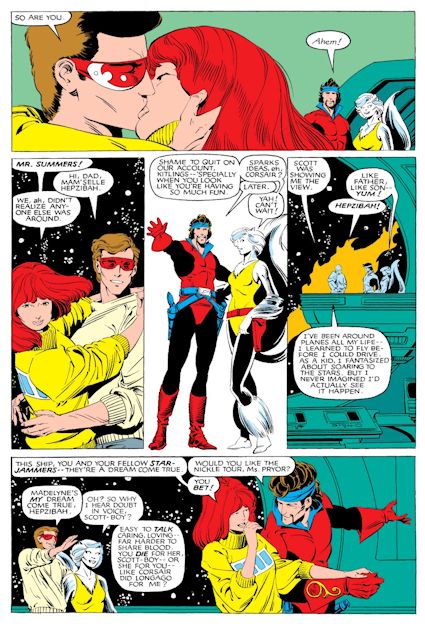
Uncanny X-Men #174, which begins this two-part sequence, begins with Scott and Madelyne aboard Corsair’s starship, the Starjammer, looking down on the Earth. It’s meant to be a last true romantic moment between Scott and Maddie before Mastermind makes his move against them. However, it’s also meant to supply both an element of foreshadowing, as Corsair and his lover Hepzibah walk in on them. The older couple offers advice to the younger one, but it’s also framed in terms of a warning that later comes to pass. When Scott mentions to Hepzibah that he sees Maddie as his dream come true, Hepzibah offers her response: “So why do I hear doubt in voice, Scott-boy? Easy to talk caring, loving—far harder to share blood. You die for her, Scott-boy—or she for you—like Corsair did longago for me?” Scott brushes this off, but it’s clear that Hepzibah has struck truth, the fact that he still isn’t entirely sure whether she has some connection to Jean Grey.
What seems like a throwaway line at first glance is Claremont’s statement for this entire story. Hepzibah is entirely correct about Scott and Madelyne’s relationship. Their bond has not truly been tested, and we have not seen either make a difficult sacrifice for the other up to this point. Hepzibah and Corsair do have a lasting bond that is forged in fire; Corsair saved Hepzibah from a Shi’Ar slave world (as shown in a later Classic X-Men backup story), they fought a revolution against D’Ken together, and the two have saved each other’s lives more than once during their relationship. As Hepzibah would remind Scott, their close brushes with death “forged bonds that’ll never break”. They have no doubts about each other after their shared experiences that had brought them together. Scott and Maddie have not been tested in the same way, either emotionally or against shared struggles that they’ve faced together. Claremont likely intended From The Ashes to be that trial by fire for Scott and Madelyne, the story that would test their bond and ultimately strengthen it.
However, we see that although he’s still in the glow of infatuation with Madelyne, Scott isn’t entirely certain about what he wants. When Corsair mentions that he’s leaving Earth soon with the Starjammers, he offers Scott a place with their crew. We see that Scott has doubts about this, with the implication that he’s torn between Madelyne and his temptation to accept Corsair’s offer to see the stars. There’s also the question about Scott’s place with the X-Men, whether he wants to be their leader and what Maddie’s place would be with them. Scott presents himself as the man with all the answers, but deep down, he’s faced with uncertainty about everything—about his love for Maddie, about the X-Men, about himself and his own future. He hasn’t been fully tested yet, and he hasn’t worked out where his true purpose lies and what he really wants.
The following scene shifts to Xavier and Lilandra, and we learn that Lilandra is soon to return home with the Starjammers. She must do so, now that Deathbird has seized the Shi’Ar throne on Chandilar, and her responsibilities are clear. Xavier must likewise stay on Earth to watch over the X-Men and the New Mutants. However, the importance of this scene pivots towards Madelyne and Xavier’s thoughts on their situation. Xavier has attempted to read Maddie’s mind, but unsuccessfully. Claremont tries to explain it by claiming that Maddie’s immunity to Xavier’s telepathy is a natural phenomenon, that some humans have a rare ability to do this. This appears unlikely, and a bit of a handwave to cover why Xavier doesn’t just provide the answers. It’s also an unconvincing one, given that we’ve never seen any significant human characters with a similar immunity. Still, if you accept the idea that Maddie is a clone, then it’s easily explained as Jean’s telepathy blocking Xavier out of her mind. Although even taken for how Claremont intended this story, it’s a minor enough issue that it’s easily brushed aside.
Claremont shifts back to Scott, who is wrestling with his own doubts. He wants to be happy with Madelyne, but there’s a doubting part of him that keeps questioning the situation. Scott is an ordered character who needs things to make sense, and there are elements of her story that he’s unsatisfied with. That doesn’t stop him from making an offer to Madelyne—to accept Corsair’s offer together, and for both of them to leave the Earth with the Starjammers. The question is left open and unanswered by Maddie, as the scene shifts to a romantic moment.

The story turns briefly to Wolverine, who goes alone to the home of Clan Yashida to demand answers about why she left him at the altar. Mariko is still mind-controlled, and she refuses to give Logan a satisfactory answer: “it is the only answer you deserve, murderer of my father.” This is no answer at all, and Logan remains unsatisfied. After all, Logan is fully aware that Mariko had no regard left for her father, and she had considered killing Lord Shingen herself in the Wolverine limited series. Shingen had dishonored Clan Yashida, and as his daughter, she felt a duty to wipe that shame from her house. Mariko had accepted Logan’s love because, by killing Shingen in honorable combat, he had saved her from a shame that she would never have been able to escape. Logan, knowing this, perhaps may have suspected that something was wrong, but didn’t have enough information to act. Logan returns the Honor Sword to Mariko, proclaiming that “if I’m not worthy of you, lady, I’m not worthy of it!” The scene ends as the Silver Samurai gloats, claiming that Mariko has made him her heir, and Mariko casts Logan out with words that Shingen would have used: “Wolverine, my love is for a man, not a beast cast in human form. Leave my sight, my house, my land, forever.” If Wolverine suspects anything is amiss, we are not privy to that, because he walks away without a word.
The focus returns to Scott and Madelyne, who are back on Earth and flying on Maddie’s plane towards Anchorage. We find out that Scott had proposed to Maddie after the previous scene, and that Maddie accepted the proposal. We also see that she’s wearing an engagement ring given to her by Scott. It isn’t clear why Claremont jumps over the proposal and why we only see that it happens after the fact. Typically, with superhero marriages, the proposal is treated as a huge event, even back in 1980’s Marvel. If nothing else, the presentation of the ring is a powerful visual that has emotional impact for the characters and for the readers. Even during Scott’s early romance with Jean, these moments were gradually built and we saw each stage of that relationship. Instead, Claremont ends one scene ambiguously, only to show that they’re already engaged at an unspecified later time. I’ve mentioned previously that one of my few real problems with the Maddie storyline is how quickly Claremont progresses the relationship. It may be that he did so because he wanted to build Scott and Maddie to that emotional high point before introducing the complication scene with Mastermind here. Although the execution is generally good enough and Maddie is likable enough that one can overlook the rushed pace of the relationship, there are moments where this is noticeable, as it is here.
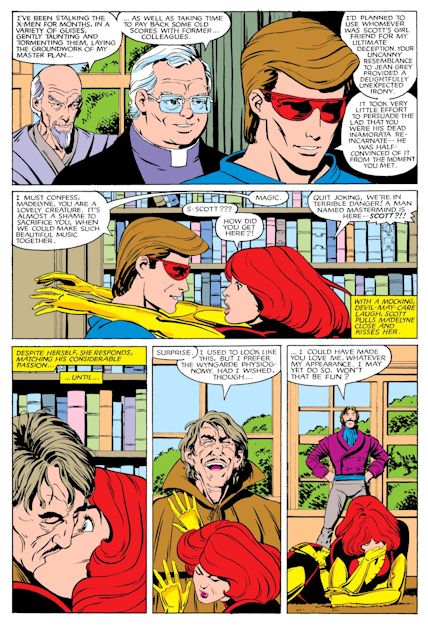
Fortunately, the Mastermind complication is introduced rather cleverly, and Claremont does deserve credit for his execution here. Mastermind is one of the passengers aboard the flight, wearing the form of a priest. However, Dark Phoenix Saga readers may remember this guise, because it is the same priest that “befriended” Jean Grey during the Claremont/Byrne run. Mastermind once more demonstrates his refusal to let go of the past, returning to an illusion that worked for him previously. In this case, though, the plan works. Wyngarde innocently “drops” an old beach photo of Jean Grey for Scott to conveniently find, with the idea of sparking his doubts about Madelyne. The photo is likely genuine, most likely taken by Wyngarde after the X-Men were presumed dead following their battle with Magneto. This token from the past, much like Othello’s handkerchief, is designed to sow the seeds of doubt and drive a wedge between the happy couple. Similarly, it succeeds, destabilizing Scott further and making him question Maddie even more, just as Wyngarde had planned.
It is quite possible that Claremont drew on Shakespeare’s Othello and its main villain Iago, either consciously or subconsciously, with this tale. In any event, there are some notable parallels between the two stories. Both stories involve a conniving and manipulative villain with a grudge against the main protagonist, in this case Wyngarde and Iago. Both villains are inflicting emotional cruelty upon their victims, using love as a weapon to destroy the heroes they scheme against. Both use love tokens to craft intricate deceptions to break the heroes on an emotional level. Both villains have a history of losing control of the people they seek to victimize—Iago loses control of Othello and Roderigo, while Wyngarde loses control of Jean Grey. Both of them also draw on illusions as their weapons—Iago and his pretense of “honesty”, and Wyngarde’s literal power of illusion. Both are also obsessed with past grievances—Iago and his belief that Othello had slept with his wife, and Wyngarde’s obsession with his past defeat in the Dark Phoenix Saga. Claremont begins his story as an homage to Hitchcock, but the conclusion steadily moves into Shakespeare.
Wyngarde springs his trap against Scott into motion later, when Scott takes Madelyne home. Claremont establishes that Wyngarde is hiding in the background, likely using his illusion power to conceal himself from Scott and Maddie. Instead of enjoying the quiet moment with his new fiancée, Scott takes Wyngarde’s bait. He raises the spectre of Jean Grey, and directly asks whether Madelyne Pryor is really Phoenix.
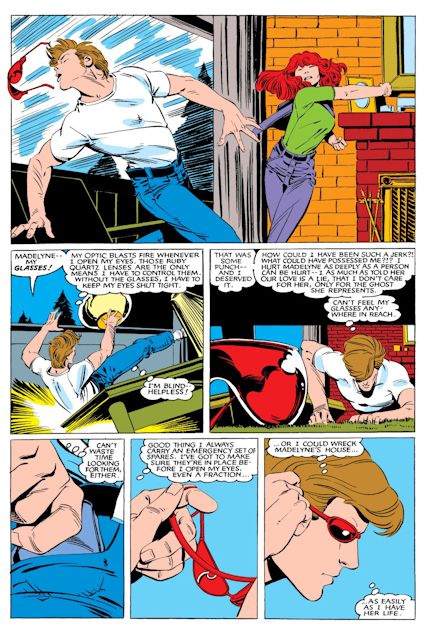
This leads into one of the best single panels that Paul Smith has ever drawn on Uncanny X-Men, and it is quite possibly one of the greatest panels in his entire career. An indignant and angry Madelyne punches Scott in the face for his accusation. The rage and pain on her face are made plain with a few simple lines, and we see that Maddie is understandably angry for being falsely accused. However, what makes this panel work so well is the way the characters are posed. Maddie’s arm is extended, her hand balled into a fist, after it connects with Scott’s face. Scott flies backwards, losing his ruby quartz glasses as he’s suddenly knocked back. The kinetic impact of this moment is beautiful, and Claremont does not add a single line to this frame. Smith’s artwork tells the story so well that nothing else is needed but that image. It’s also emotionally compelling—we are meant to sympathize with Maddie’s outrage, because as readers we know that Scott is in the wrong. We respect Maddie for not tolerating Scott’s behavior in this moment. We know that Scott is being manipulated as well, and though we understand why he poses the question, it’s heartbreaking when she answers it with a fist to the face. This one panel tells so much of Claremont’s story, and it is one of the finest moments of the Claremont/Smith run.
Scott fumbles around the home to find his glasses, knocked from him during the encounter. He must keep his eyes shut as he tries to find his glasses, since he can’t risk his power destroying the house and hurting Madelyne. This moment gives us a symbolic blindness, where Scott’s physical blindness represents what he is failing to see as a character. Scott is blind to the woman he loves, blind to who she truly is and what she wants from him. All he sees is nostalgia, the past, and the woman he lost, not the woman who was in front of him just moments ago. Scott is wearing nostalgia-colored glasses in front of Madelyne, seeing Jean Grey instead of the woman she really is. The issue ends with Madelyne Pryor appearing before Scott in the form of Dark Phoenix, an illusion created by Jason Wyngarde.
Uncanny X-Men #175 is billed as a “20th Anniversary Issue”, and its release in 1983 celebrates the twentieth year of the X-Men. This also illustrates, perhaps, why elements of the storyline seem rushed. Claremont’s biggest weakness as a writer during the early half of his run tends to be the way romantic storylines are often fast-tracked to meet milestone stories. This happened previously with the Magneto storyline with Scott and Lee Forrester, and the same happens again with this issue with Scott and Madelyne. In fairness, however, Scott and Maddie genuinely possess chemistry in these issues, and their love story is better executed than the Lee Forrester romance. It is possible that, by this time, Claremont had learned from his previous missteps and managed the relationship better with Maddie. Regardless, this proves to be an excellent issue, and especially one of my favorite issues featuring Cyclops.
The beginning of the issue looks idyllic and simple enough, with the X-Men clearing trees on the school grounds. This brief moment of stillness is broken by the flash of a firebird, as the Phoenix Effect fills the sky, and someone is seen falling. This turns out to be Scott, who Rogue catches in midair before he hits the ground. It is never explained exactly how Scott ends up in this situation, but it’s possible that Wyngarde pushed him out of an aircraft, all the while maintaining his illusion of Dark Phoenix. Whatever the reason, Scott is still convinced that Madelyne is Dark Phoenix, and Xavier calls the X-Men inside to discuss the situation.
Scott recaps the situation, providing exposition about the events leading to the appearance of “Dark Phoenix”. Professor Xavier has his doubts about the situation, regardless of Scott’s feelings about it. Xavier points out the inconsistencies in Scott’s accounts, noting that these actions do not make sense if Phoenix is truly responsible. Xavier also mentions a significant point, that he did not sense Phoenix’s return and should have if this were real. He uses Cerebro to locate her, but it backfires and knocks Xavier unconscious, an apparent act of sabotage by Mastermind. Kurt teleports Xavier to the infirmary, while Mastermind makes his next move.
Cyclops appears to transform into Dark Phoenix in a dramatic moment. However, everything, including her entire opening speech to the X-Men, is an illusion created by Wyngarde. This is a dramatic panel, however, and Paul Smith makes his “Jean Grey” look dramatic and godlike in her appearances. In the next few pages, “Dark Phoenix” appears to defeat the X-Men with relative ease, though how much of this is illusory and how much of it real is never entirely clear in these scenes. From there, Wyngarde ups the stakes even further, showing the illusory deaths of the Starjammers and the Avengers, perhaps to convince the X-Men that the threat of Phoenix is real. The X-Men are completely cut out of contact from the rest of the world, and all the information they receive are lies created by Wyngarde to manipulate the team.
Following this, Scott is taken to the infirmary as well. He is physically healthy, but his health is deteriorating for no clear reason, presumably psychosomatic. We see that Scott’s astral form has left his body, though it’s never explained why this happens. At this point, Scott is trapped in a state between life and death, being drawn towards the light and what lies beyond. He sees spirits around him, but one comes before him and tells him to stop.
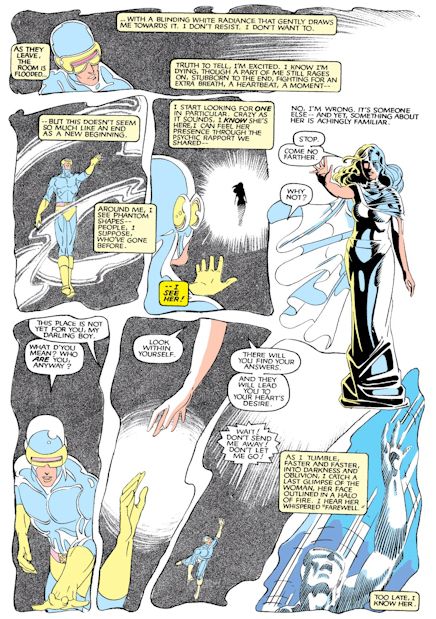
This mysterious spirit turns out to be the ghost of Katherine Summers, Scott’s mother. This is the first and only time we see her outside of occasional flashbacks, and only to prevent Scott from crossing over into death. “This place is not yet for you, my darling boy,” she tells him. “Look within yourself. There you will find your answers. And they will lead you to your heart’s desire.” Although these words seem simplistic and not overly helpful, they are the words that Scott needs to realize the truth. Up until this point, Scott has not been looking within himself at all. He has been blinded by the ghosts of his past, both of his own invention and those conjured by Mastermind. Scott knows on a deep level what he truly wants, but he hasn’t acknowledged that truth to himself. Up until this point, Scott has not wanted to do so, because it would mean admitting to a painful reality that he hasn’t wanted to accept.
The truth of the situation, which Scott now is forced to acknowledge, is that Jean Grey is really dead. Dark Phoenix had never returned from the dead, as much as Scott may have wished for Jean to return to him. Madelyne Pryor was never Jean Grey, just a woman who happened to resemble her, an innocent woman who was swept into a villainous scheme. By awakening to the truth, Scott also awakens to the realization of what he had done to Madelyne, the mistakes he made in his own blindness.
With the blinders taken away from him, Scott follows up with perhaps his single greatest moment of his published existence. With a renewed focus, he swiftly deduces who he’s up against and what he’s truly after. Scott realizes that there was no Dark Phoenix, that Xavier was incapacitated to keep him from revealing the truth, and that Mastermind is the villain responsible for the entire scheme. From there, he swiftly devises a plan to defeat Mastermind, who by this time has manipulated the X-Men into believing that Cyclops is Dark Phoenix.
In the next few pages, Scott executes his plan, defeating each of the X-Men one on one. One would think that this would be a difficult trick to accomplish, given how powerful his teammates are. Scott is, for the most part, an ordinary man aside from his optic blasts. His opponents include powerhouses like Colossus, Storm, and Rogue. However, he has several advantages of his own, including knowledge of the terrain and all of the weaknesses of the X-Men. Moreover, the X-Men do not realize that they are facing Scott; they all believe that they’re fighting Dark Phoenix. Scott faces several of the X-Men at once, using their patterns, his knowledge of judo and well-placed optic blasts to keep the team off-balance. From there, he tricks Kitty into phasing through the floor, where they land in the Danger Room.
The next phase of Scott’s plan involves using the Danger Room to lure one particular X-Man in. By this time, he has sabotaged the main controls of the Danger Room, knocking out Nightcrawler by overloading the panel. Scott has full control of the Danger Room through a remote control device, which he uses to control the simulation. In the end, though, while Scott appears to be fighting for his life against the X-Men, the plan is also to fool Mastermind into thinking he has the upper hand.
This ends up being an interesting development, as Scott empowers himself with the very weapon that Mastermind himself uses. By taking control of the Danger Room and luring the X-Men inside, Scott effectively uses his own illusions to counter Wyngarde’s. Both of them manipulate reality as they see fit—Wyngarde with his mutant powers, and Scott through the use of Shi’Ar technology. The two are battling with competing narratives, wrestling for control of reality and how the X-Men perceive it. The battle becomes one of perception, with Scott attempting to deprogram the X-Men and break the spell cast over them by Mastermind.
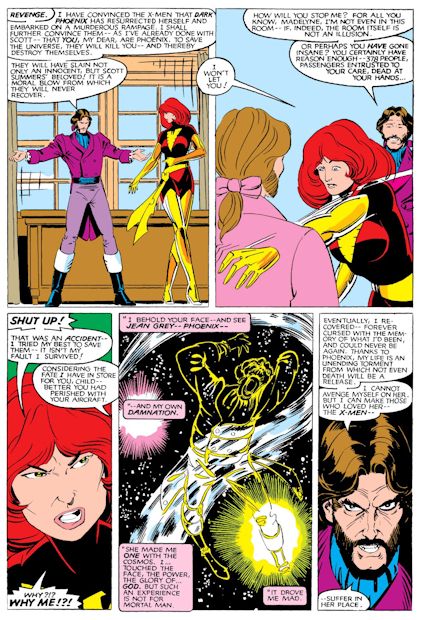
In the meantime, Wyngarde reveals himself to Madelyne Pryor, in part to taunt her. However, it may also be a display of ego, as he feels secure in his position of power over the X-Men within their own home. Wyngarde reveals his endgame to Maddie—he plans to manipulate Scott and the X-Men into killing Madelyne, a “moral blow from which they will never recover”. Wyngarde then taunts her by raising the ghosts of Maddie’s past, the 378 people she failed to save with her crashed airliner. When Maddie demands to know why Mastermind is doing this, he explains that when Jean made him one with the cosmos, he went insane, unable to process that knowledge. “Thanks to Phoenix,” Wyngarde says, “my life is an unending torment from which not even death will be a release. I cannot avenge myself on her. But I can make those who loved her—the X-Men—suffer in her place.” Wyngarde is lost in the past, his past defeats and stuck in that moment where he was connected to all of reality, unable to escape it. Unable to make peace with his past, Wyngarde has decided to destroy the X-Men instead, a pattern of revenge that he can never escape from. Even if he succeeds, Mastermind will always be tormented by the consequences of his own actions, stuck in the past in an unending loop. He will always be stuck reliving the memory of Dark Phoenix, both his triumph and his tragedy.
The scene ends with Wyngarde explaining the rest of his plan, the shapes that he took in his plan to destroy the X-Men. He confirms that not only was he the priest aboard the airplane, he was also the architect behind the plan to ruin Wolverine’s wedding. He taunts and torments Madelyne, briefly showing her his true form before returning to the Wyngarde guise. Unfortunately, Maddie becomes the damsel in distress of the story and doesn’t get much opportunity to do anything with this information, but it is a good, dramatic scene that answers the important questions. Some do remain unanswered, such as why Wyngarde targeted Mystique early in the Smith run, but the larger tapestry of the plan still manages to hold together despite those concerns.
In the meantime, Scott has managed to take Wolverine and Colossus out of the battle with well-crafted traps designed to disable them but not cause real harm. From there, he lures Storm and Rogue out in the open, disabling Ororo with a single well-placed shot. Because Storm was not expecting Scott, she did not expect his keen accuracy with his optic blasts. With the X-Men otherwise out of commission, Scott finds the one X-Man he needed for his plan: Rogue. He manages to defeat her swiftly as well, using simulated “poppy dust” to knock her unconscious.
Scott’s real plan all along was to take Rogue to the infirmary, using her power to absorb Xavier’s telepathy. Rogue is initially unable to deal with her new telepathy, but Scott has enough experience with Jean and Xavier to guide her through the process. At this point, Scott’s goal becomes clear—use Rogue to unmask Mastermind with Xavier’s powers. This breaks the illusions around the X-Men and forces them to see the truth, that Wyngarde has deceived everyone the entire time.
With the X-Men freed, they confront Mastermind, still using his illusions to conjure Dark Phoenix to manipulate the team. However, when Scott calls Wyngarde out on what he’s done, the real Mastermind uses a silenced pistol to shoot Cyclops. The shot turns out to be non-fatal, but it does briefly disable him. Storm uses her weather powers to keep Wyngarde in the room while Wolverine hunts him down. For a brief moment, they very nearly kill him, and the X-Men are tempted—but Storm decides not to kill a defeated enemy. To Ororo, “that would be murder, Logan. It would make us no better than him.” However, Rogue realizes that beneath the surface, Storm was “ready not only to kill him, but sacrifice the lot of us as well.” Although Ororo is not the focus of this story, Claremont has not overlooked her transformation, a story that would take root in the upcoming run with John Romita Jr.
Before the story is concluded, Scott frantically searches for Madelyne, only to find her lifeless, apparently drowned in Ororo’s flash flood. Cyclops delivers CPR to Maddie in a desperate effort to revive her. In a moment reminiscent of a classic fairy tale, Madelyne awakens to true love’s kiss, and she and Scott have a happy reunion in each other’s arms. We see at this point that Scott has overcome his doubts about Madelyne completely, and that he has faced his test and passed. At this point, Scott and Maddie have faced their first real challenge as a couple and prevailed, leading to their wedding in the following scene.
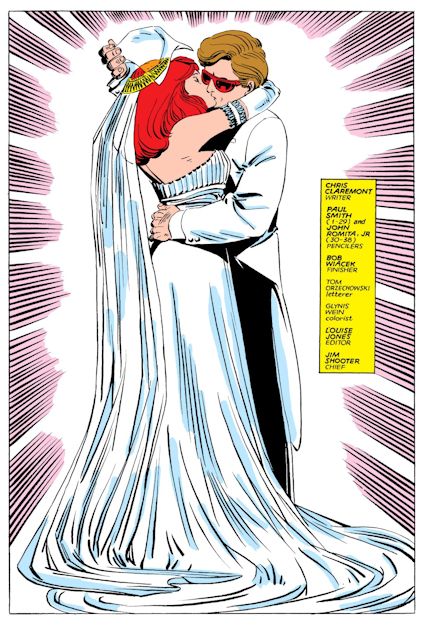
At this point, we see a handing of the torch from Paul Smith, who draws the last page where Madelyne is saved, to John Romita Jr., who illustrates the remainder of the issue and takes over the book after this issue. Smith completes the main story, including some of his most outstanding work on his run on Uncanny X-Men. However, Romita draws the epilogue, where Scott at last comes to terms with the death of Jean Grey (if only briefly), and the wedding of Scott Summers and Madelyne Pryor. Maddie being restored to life brings a symbolic end to the Mastermind story and Paul Smith’s arc on the book, opening the door to new beginnings and the start of a new chapter of the X-Men under Romita Jr. It looks like a seamless transition between the two artists as well; though their styles are noticeably different, the artistic shift doesn’t take the reader out of the comic in the slightest.

When we return to Scott, he visits Jean’s grave, an act of letting go of the memory of Jean. “I loved you, Jean,” Scott tells her. “I love Madelyne. I’m glad she isn’t you. What we had was magic—I’ll treasure it always. Now, Madelyne and I have the chance to create our own magic, to make what is as unique and special as what was. I hope you understand.” That statement is a clear declaration that Scott has severed his ties with the past, that he can let go of the memory of Jean. Scott is no longer blinded by nostalgia, no longer consumed by thoughts of what he lost, but instead looking towards the future and the happiness he can create for himself and his new wife. This entire arc was about the act of letting go, about honoring the past while making room in Scott’s life for the future. For Scott, who has spent his entire life punishing himself for the slightest mistake, who has been haunted by death as a leader, this is a significant act of growth, and one that should have been allowed to stand.
The finale gives us a proper wedding, one that is not interrupted by super-villains trying to rend the union asunder. Where modern wedding stories often have a stigma attached because of past aborted weddings, this one is a proper happy moment as Scott and Madelyne get married. The wedding gets a fair amount of space, and we see Scott’s family and the X-Men react to the wedding in their own ways. Even Logan, still wounded after Mastermind sabotaged his wedding, still attends the ceremony, and supports Scott after all they’ve been through. It is a moment that shows that although Logan will always have his differences with Scott, there will always be a respect between them.
Unfortunately, while there were good intentions with this story, the nature of corporate comics would undermine From The Ashes in hindsight. Claremont’s intent with Scott at this point was for him to let go of the past, to finally move on with his life and build a future with Maddie. Claremont always wanted the X-Men to grow and evolve, for some members to leave the team and even retire. He certainly saw Scott in that light. It is quite possible that Claremont considered this the end of Scott’s story, at least involving him as a romantic hero. Scott would come back occasionally under Claremont, most notably during the Asgardian War events (including the X-Men Vs. Alpha Flight mini by Claremont and Smith). Had Claremont’s vision been honored, it is likely that we would never have seen these issues revisited ever again, and Scott and Maddie would largely have been retired except for occasional guest appearances.
In the end, though, the return of Jean Grey a few years later would cast a shadow over this story. From The Ashes was about the act of letting go, of seeing the truth and finding the courage to walk away from the past. The act of freeing the past opens up doors to the future and new opportunities for growth. However, the resurrection of Jean destroys this entire idea on a thematic level. Worse, it opened Scott’s old wounds, ultimately regressing him to revive a status quo that this story attempted to leave behind. Like “The Return of Barry Allen” storyline in The Flash, which also teased the return of a dead classic character, the later resurrection makes the story less than what it was intended as. In both cases, these stories were meant to provide growth to the surviving characters by falsely hinting at these resurrections, and both are considered classics today. Sadly, because corporate comics are likewise trapped in a cycle of nostalgia, where nothing meaningful can change for long, and popular characters never stay dead, these kinds of stories can never truly flourish as they should.
However, we will discuss the resurrection of Jean in more depth in upcoming installments of this Retrospective at a more appropriate time. This particular issue would prove to be a thorn in Claremont’s side for many years. It would also have deep consequences for Scott and Madelyne later into the Claremont run, especially during the Inferno storyline involving the X-Men and X-Factor years later.
As a final note on From The Ashes, I will admit that this is my favorite Cyclops story of all time. Other fans may prefer his later portrayals and I accept that, but the “boy scout” interpretation is the way I will always see the character of Scott Summers. Although the Mastermind story has its flaws, as I’ve noted in parts of this installment, this story gave us Scott Summers at his absolute best. He’s flawed, blinded by his past mistakes and by his perfectionism. However, this story used those flaws to show what Cyclops can be—a great leader, a skilled tactician, a man who is laser-focused on what is right and what is true, and someone with a deep capacity to love despite his past wounds. At the end, he has the strength and the courage of his convictions, and he walks away from the memory of the woman he loved so he can face a brighter future without fear, guilt, or pain. This is the Scott Summers I choose to acknowledge, and the version that has been all too often ignored by later writers. Under Claremont, Cyclops is an excellent character, and he never needed to be made anti-heroic or “edgy” to be a cool, strong heroic figure. If Claremont accomplished anything during his long tenure on the X-Men titles, it was telling some of the finest Cyclops stories ever written, and this one remains his best in my view. From The Ashes embodies everything good and noble about Scott Summers, and this is the standard that Cyclops stories should aspire to reach.
From here, let us briefly turn our attention to Uncanny X-Men Annual #7. This issue offers a much lighter tale, which is welcome after the romantic drama and the epic villainy of the Mastermind story. At the same time, it also is a largely forgettable story, featuring a scavenger hunt instigated by the Impossible Man. This is largely a comedic issue, featuring appearances from across the Marvel Universe. The issue also features appearances by members of the Marvel Bullpen, including then-Editor-In-Chief Jim Shooter, writer/editor Mark Gruenwald (the basis for Agent Mobius in the Loki Disney+ series), editors Eliot Brown (who was often involved in illustrating Marvel technical manuals) and Mike Carlin (who would later move to DC), as well as other notable figures like Larry Hama (best known for his runs on Wolverine and G.I. Joe) and artist Michael Golden. In broad strokes, the story is a madcap romp to collect items from across the Marvel Universe as part of the Impossible Man’s cosmic game.
The Impossible Man is a character who Claremont would only use a few times, yet one that he had some affection for. As mentioned in previous installments of this Retrospective, Claremont was a longtime fan of the Fantastic Four, and he would occasionally bring in characters from that title over the years. Doctor Doom is perhaps the most notable example of this. However, Claremont would occasionally draw on lesser-known classic villains from the Lee/Kirby run of Fantastic Four, including Impossible Man. Impossible Man is essentially a cosmic-level shapeshifter who acts like a childish prankster. 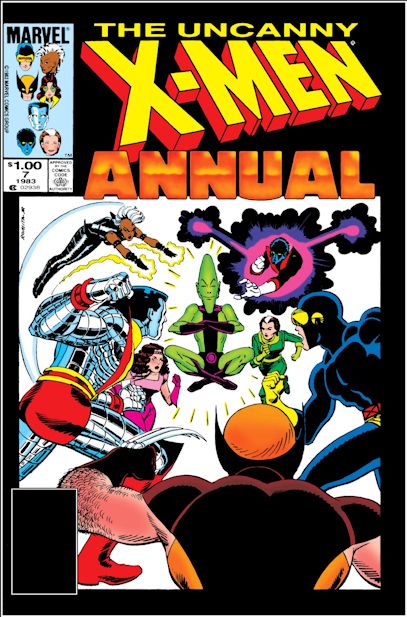 Typically, his stories would all be comedic romps under Claremont, usually descending into silliness with a dash of British-style humor. These would be most effective in his later collaborations with British writer/artist Alan Davis, both in New Mutants Annual #3 and later during their first run on Excalibur, the title they co-created.
“Scavenger Hunt” is somewhat less effective than those outings, partly because there wasn’t a consistent art team on the annual. The credits for this issue includes a long list of artists, including Michael Golden (the same featured in the story) and Bret Blevins (best known for his New Mutants with Louise Simonson) as pencillers. The inkers were even more numerous, including such names as Terry Austin, Tom Mandrake, Bob Wiacek, Brett Breeding, Joe Rubenstein, Steve Leialoha, Sam de la Rosa, and Al Milgrom. Because of this huge list of artists, there isn’t a single consistent voice, though Golden may be the most consistent of the artists listed here. These are all talented artists who have all found a measure of success in the industry, so there is no slight intended on anyone involved with the issue. However, in comics, there is occasionally a case of too many cooks spoiling the broth, where too many voices drown out each other in the finished product. Still, the story is entertaining enough for what it is, even if it is not a story with deep implications on Claremont’s long-term storylines.
With that, this discussion brings an end to the Paul Smith run as well as this installment of the Retrospective. While I typically like to cover a broader range of issues than this, the Mastermind story is unusually dense even by Claremont standards and deserved a deeper level of coverage than what I normally provide. Next time, we’ll return to the normal format for this series, as Uncanny X-Men changes artists again. When we return, we’ll look at John Romita Jr., an artist with a distinguished pedigree at Marvel, and one with a lasting impact on the merry mutants.
Author Profile
- Steve Sellers had been a fan of superheroes ever since Superman: The Movie. But it took the JSA, the Legion of Super-Heroes, Dragonlance, Lord of the Rings, Twilight Zone, and Chris Claremont's legendary run on the X-Men to make him a writer and a longtime fan of comics, fantasy, and science fiction. Steve is the co-creator of WHITE DRUID & MICHAEL NERO and GUARDIANS OF ELAYIM for Omen Comics, and he is also the creator of BLITZ and SHOCKWAVE for Revelation Comics (an imprint of Omen Comics).